Hip Mobility / Flexibility / Stability Drills 5 – Child's Pose Complex – Level 1
This Child's Pose Complex - Level 1 is a nice way to integrate a lot of different movements.
Firstly, we are aiming to activate and rotate the thorax and arms before moving into full spinal extension which stretches out your abdominals and anterior thorax. We then bend the knee with a pointed foot to target the femoral nerve.
You can see in Rom that she moves a bit in her back - because she doesn't have back problems or pain, I am not too concerned about that. But if you had pain or you wanted to be a bit more specific, don't allow your hips or back to bend like I let Rom do here.
I like this complex because it nicely stretches out the often-neglected font side of the body and after all the sciatic nerve we have done, the femoral nerves deserve some attention as well.
Do the complex once on each side - you can retest in between sides or at the end. 2-5 sequences on each side should be plenty.
Next week, we take this complex to the next level...
Thanks to Rom Riad from Live Active Personal Training for modelling.
***Remember the competition*** post a video on youtube, instagram or facebook and tag me on it - Do all 10 in a one shot sequence and if you produce the best video, I will give you a free 1hr Skype consultation worth $180.
So the upcoming 10 exercises will publish over the next 2 weeks are to help improve how your hips move. These are some of the most commonly prescribed exercises I prescribe. This post is about explaining why I give these exercises and the principles behind the process. You can take these principles and apply them to the many different exercises you do. This list of 10 are not exhaustive nor even the BEST because for some of you, these exercises won't do much...but many of you, it will make a difference.
My post yesterday explained a bit about them...this has a lot more information...
***COMPETITION INFORMATION BELOW***
The Principles:
Here are the principles behind the order I am giving them to you and the guidelines for their use.
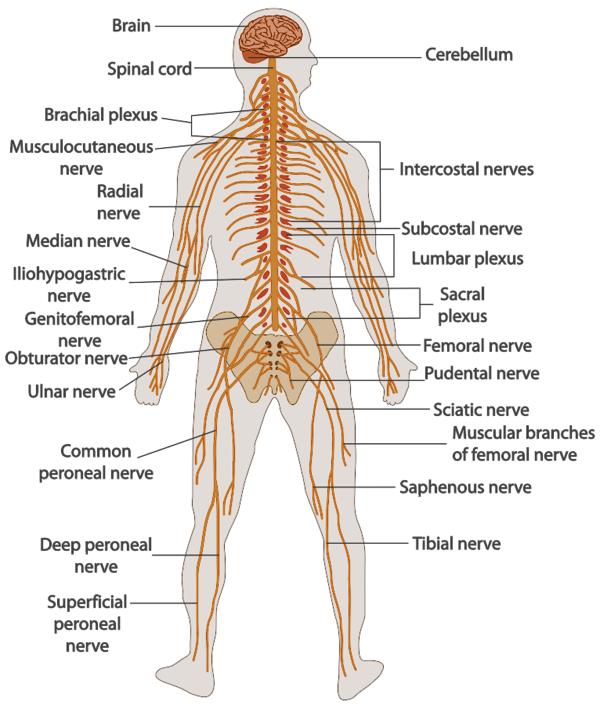 1. Neural system first.
The neural system is what powers your muscles, controls your joints and basically oversees the whole operation we call "our body". Quite often (most of the time) a restriction in our mobility (our ability to move freely with the normal range of motion we have), flexibility (how far we can move at best without damage), and stability (how well we can control our posture, position and movement) is the reason why the brain causes our muscles to "lock up" our joints. Most people who come to me reporting their hip flexors are "tight" are actually too tight posteriorly in the hip and it causes a shunting of the femoral head in the hip socket. The hip flexors are just trying to protect you from dislocating your hip out the front or at the every least trying to stop you banging hard on that labrum that might be getting sore.
So work with the body and listen to it. The first step in improving your mobility/flexibility/stability is to calm the nervous system down - that is what a lot of these exercises are doing, NOT stretching muscles. They are gradually exposing your body to different neural stimuli to help develop trust and motion in the body - you will notice that the first few are quite simple before we head into the more complicated "complexes".
The nerves in these exercises will be those in the diagram...the brachial plexus, spinal nerves, intercostal nerves, femoral nerves, sciatic nerves in particular. Treat nerves nicely and tenderly or they will really flare up any pain you have...you have been warned! NO PAIN.
 2. Supported movements
Exercises 1-8 are somewhat supported and exercises 9 and 10 are are a lot more active. None of them are truly passive because flexibility without control is dangerous. It is far better that you take a scaled option and move comfortably through these exercises...it doesn't matter if you can't go as deep or feel it as strongly...what matters is that you move through that range of motion without pain, feeling safe and stable. This is the key to allowing your brain to go from "protection" mode into "adaption" mode.
If you feel pain, discomfort, a strong stretch, unsteady, unstable, off-balance, whatever...if you feel any of that, your brain will try to protect you and WILL NOT let go of the very muscles that you are trying to target.
You problem is that those muscles are overactive and acting as stabilizers when it IS NOT THEIR JOB to be a stabilizer.
Retraining the brain is what we are trying to do here. If you want the brain to cooperate, make it feel safe and supported.
 3. Active movements
I have lots of variations of these exercises which include more twists and turns - feel free to improvise - there is no WRONG way to do things, just that there are some ways better than others.
A common saying I have is "which way do I want you to do this exercise (like a squat)? ALL of the ways". I want your brain to have access to a positive experience of mobility/flexibility/stability/strength in end of ranges positions and throughout the WHOLE range of motion. This is the key - V A R I A B I L I T Y is the king. If you can competently squat with a narrow stance, wide stance, hips back, knees forwards, deep, shallow, mega-upright, low bar, high bar, front, OHS, safety bar, belt, air, dumbbells, barbells, plates, split squats, etc etc etc, then you are most likely to be as insured against problems as you can be. If you can only squat a few different ways, you have less variability in your game and will be prone to problems.
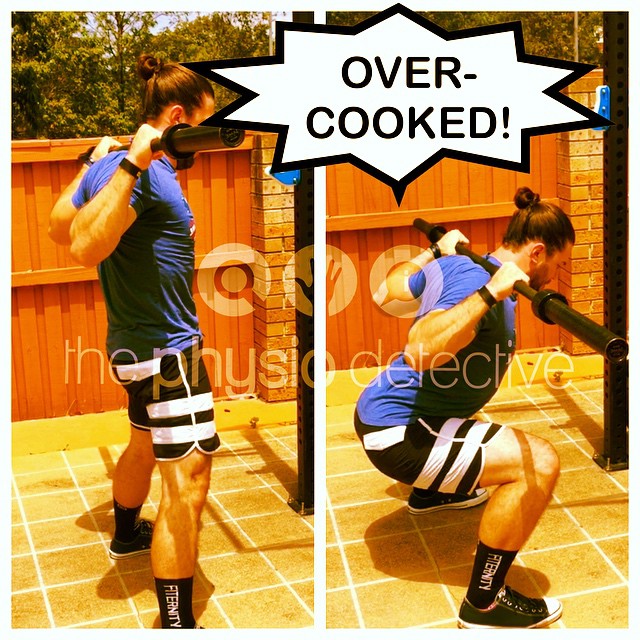 4. #tensiontotask
This concept is simply applying JUST THE RIGHT amount of tension to complete the task with good posture, positions and movement. Don't "overcook" it. Don't be loosey-goosey. It is virtuosity i am after, not how hard you can squeeze your muscles!
5. #spreadtheload
This concept is about breathing and holding your breath (Valsalva if you will) - I don't care how you breathe or hold your breath. It is harder to breathe throughout these movements but if you have to hold your breath, consider it a scaled version of the exercise and progress towards breathing. if you do hold your breath, make sure the tension from holding your breath is spread around the whole of your chest, abdomen and back like a cylinder. More on this concept will be coming soon.
 6. The 30-seconds Rule
This means that you choose a movement you want to improve - bending over or squatting or lunging are good ones for the hips. Then you do 1 rep on 1 side of these exercises or maybe you can do 2 reps on one side. Then you retest. Then you do the other side for 30secs and then retest. If you progress in your movement quality, you have permission to go again for 30secs on each side. You repeat until there are no more gains. This rule applies to foam rolling, using a lacrosse ball or any other stretch or exercise you like to do as a warm-up.
 7. Prescription for these drills
- Do them in order for the best effect but each can be done on their own - remember the principles above!
- I recommend following the 30secs rule - sometimes twice through is enough. As many as 5 reps or more might be needed (if so, it's time to speak to someone about the stress in your life!)
- NO PAIN - I mean it. That goes for anything you are trying to learn or retrain the brain in. Sometimes my techniques might hurt but I really do carefully weigh up why I am doing it and I try to minimise the pain as much as possible. There shouldn't be pins and needles, numbness, soreness, discomfort etc etc. It should be a comfortable effort/stretch. if it makes you pull a face, it is too much...scale back!! You will get much better results this way in the long run.
- If you have any hip or back or shoulder pathology or pain, please check with your health professional about these exercises...they are meant to be as a guide for healthy people but with guidance for those with pain or pathlogies, they can be extremely effective in helping you get out of pain. These exercises are for informational purposes only and DO NOT take the place of seeing your health professional
- NO PAIN - read that bit again!
 Competition Information:
I want to see your attempts at these exercises - tag me on instagram or twitter with @physiodetective or post it on my FB page at www.facebook.com/physiodetective. Just one rep should be enough on one side (15secs won't be long enough for some of these exercises!). Thanks again to Vicki Smart from Peacock Dreams - Yoga With Vicki Smart and Rom Riad from Live Active Personal Training for being great models.
I will give free feedback (as humanly possible) for anyone posting their exercises.
I would like to use the best ones as examples of how to do them and any variations you have on them please - I will cite/reference your name, business (any business) and website for those that I choose.
I am offering a 1hr Skype/in person appointment consultation (Value $180) for the person that can produce the BEST video that has 1 rep on each side of each of the 10 exercises IN ONE TAKE (no editing). That video (it will have to be on YouTube or Vimeo) will be featured in a blog post with your details on it.
Last Words
OK gang - I hope you are ready for the release of these exercises with video! I'm glad to be sharing with you some of what works for me and my clients.
Remember...what I do is not rocket science...it is simply specific for you and for your body. If you don't find these exercises are good or helpful for you, that's ok...book an appointment in with someone (or me) and get something specific for you.
Have a good weekend and check your email or this blog at 7am Monday morning Australian Eastern Time.


Awesome bro.
CPTW blog posts?
You keen mate?
Yep. I replied earlier.
Pingback : Hip Mobility / Flexibility / Stability Drills – The Theory – myPTeducation